Chapter 11 railUnreal
"So let's ride and ride and ride and ride
Singin' la la la la la la la la"
- Iggy Pop
Description
railUnreal integrates tracks and trains with Unreal's NVidia PhysX based physics system. It is a
C++ plugin to Epic's Unreal Engine, based on the theories in this book [8], but to
be used it does not require any mathematical or programming skills. Simple object composition allows an artist to
build track systems and 'WheelFrame' - scene components rail nearly everything on them. The dynamics then is
calculated completely by the physics system of Unreal, yielding an unprecedented degree of realism and
interaction as well as integration into the game engine.
The core element of this library is the so called 'trackjoint', that keeps an object aligned with a
track. It is a set of constraints communicated to the physics engine directly, so it works seamlessly with
other forces and constraints in the simulator. This was discovered lately during the development of various
railroad simulators at Trend Verlag in Freiburg, Germany [9]. It turns out that rigid
body simulators are not so well made for dead ragdolls or collapsing brick walls - but for railroading!
A word of warning is appropriate at this point: even if the trackjoint is highly configurable, and
there are motors and brakes to work with it, it is made to be used in the frame of a physical simulation.
So in a game or other application there has to be some room for the results. If the result is always known
in advance, is non-physical and has to be enforced by additional actions, then a simple animation might be
the means of choice.
The plugin by nature is pure logical, so the assets contained in this plugin are meant merely for the purpose
of demonstration and not for production. Some assets in some tutorials stem from the 'Starter Content' or
from other Unreal marketplace packages and are used for imagery or the sample game, but are not included
with the railUnreal plugin (nor the sample project).
Features
- Physically correct movement of arbitrary objects along the tracks and beyond.
- Collision with static, kinematic and dynamic objects in the scene.
- Disastrous derailments.
- Dynamic (re-)railing.
- Track components to build track lines.
- Movable tracks.
- Vehicle rigging and coupling.
- Long trains with (nearly) arbitrary numbers of rolling stock.
- Realistic intra-train movement of carriages.
- Couplings between carriages can be made breakable by force limits.
- Accurate simulation of motors and gears by velocity-traction-characteristics.
- Brakes and friction model.
- Delegates for important events.
- Sound components play sound cues on events.
- Very stable simulation.
- No Math, C++ or Blueprint skills needed - but can productively be applied, when available.
- Blueprintable Components.
- Solid theoretical foundation.
- Detailed documentation.
- Windows, MacOS and Linux compatibility.
- Based on the trax - library [8].
Version History
v1.04
- Unreal v4.27 compatibility.
v1.03
- Added the trax - library as an Unreal module, so source code is available in the plugin now.
- Added Linux and MacOS compatibility.
v1.02
- Unreal v4.26 compatibility.
v1.01
- Initial feature set.
- Unreal v4.25 compatibility.
TODO
Railroading is a never ending endeavour and this is railUnreal version 1.0X. So we maintain a list
of planned features to be realised in upcomming versions of the plugin. The list is alive and
ordered by priority;
- Sample Game that allows a player to test the limits of the plugin.
- Teaser-Video that shows the core functionality of the plugin and explains what it can be used for.
- Point-To-Point parallel tracks.
- Support more platforms.
- Support network replication.
- Train-SceneComponent.
- Sensors.
- TrackSystems and TrackCollections.
- Connector system (i.e switches etc.)
- More detailed and versatile simulation of buffer/coupling system.
- Signal system.
- Integrate Unreal's own curve type (R->R³) to fit as a track curve.
- ...
Tags
- Track
- Train
- Railroad
- Simulation
- Physics
- Vehicle Physics
- Frenet–Serret Formulas
- Newton's Laws of Motion
railUnreal
In railroad simulations and games the movement of train carriages typically is ruled by ad hoc
dynamics that more or less [1], [2], [3] (or not
at all [4], [5]) are oriented on Newton's dynamics. If a rigid
body physics engine is involved in the system at all, it is not used for determining the train movement;
at most the carriages are converted to physics engine objects on derailing only, like [2]
or [3] do. These systems in addition have to handle 'The Actio Equals Reactio Problem'
if the dynamics of the railways and the one of a physics engine is to be combined (see Chapter 5).
This is a great shortcomming, since as it turned out with EEPTSM [6],[7],
the rigid body physics engines are excellently suited to simulate the train dynamics in a stable and
predictable simulation if this is done using so called constraints. Due to the mathematical complexity
of the issue (see Chapter 7), we put this knowledge into a library for Unreal Engine.
Admittedly, there are other railroading packages in this world, but half of them do not know who Sir Isaac Newton
even was - and the other half got him wrong. We are doing this for real, and therefore we want to name the plugin
'railUnreal'.
Installation
- Install Epic's Unreal Engine 4 Editor 4.25 or higher.
- Install the railUnreal Plugin from Epic's Marketplace. (Or install it to the 'Engine/Plugins' folder of the 'Unreal Editor' or install it to the 'MyProject/Plugins' folder in your project created in the next step.)
- Under 'Games' create a blank project with starter content.
- Activate the railUnreal plugin (Menue->Edit->Plugins->Installed->Physics->railUnreal).
-
In the 'Project Settings' Panel under 'Engine->Collision' create an 'Object Channel' and name it 'railCoupling'; select 'Overlap' for 'Default Response'.
-
Create a 'Collision Preset' named 'railCoupling' again, set it to 'QueryOnly' and make the 'Object Type' 'railCoupling'. Set all
'Collision Response' to ignore, but for 'railCoupling' to 'Overlap'. This collison channel will be used for the couplings between rolling
stock.
First Steps
- To the scene with the chairs and the table add an empty actor from the 'Place Actors' panel.
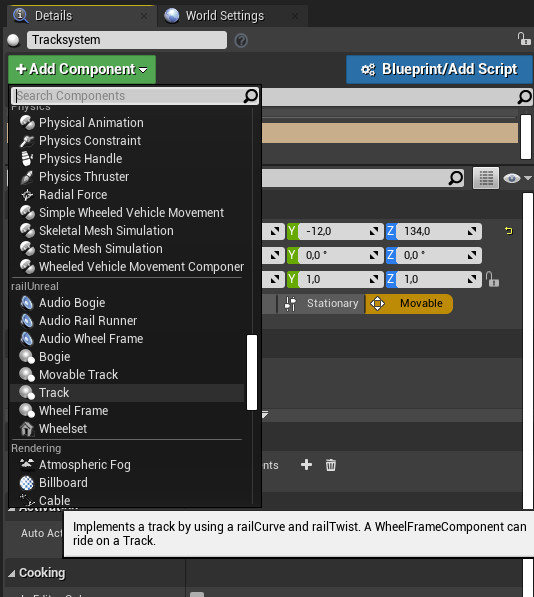
- Select the actor and from the 'Details Panel' hit the 'Add Component' button.
- In the appearing list scroll to the 'railUnreal' section and select the 'Track' component. A straight track appears in the 3D view.
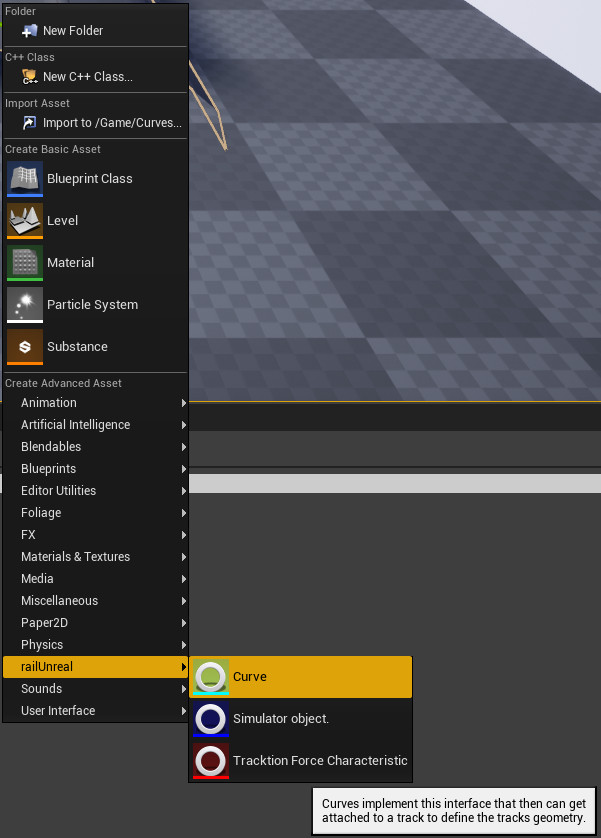
- In the 'Content Browser' hit the button 'Add New'; from the 'railUnreal' section select 'Curve'.
- In the appearing dialog select 'Helix' and hit 'Select'. In the 'Content Browser' a new helix curve asset appears.
-
Select the track component in the 'Details Panel', open the railUnreal->Curve section and drag and drop the helix curve
asset to the 'Curve' slot. The track gets the shape of a helix.
- Select one of the chairs and from the 'Details Panel' add a 'WheelFrame' component from the 'railUnreal' section to it.
- Move the 'WheelFrame' component to { 0, 0, 40 } and in the railUnreal section set 'Bogie Height' to 40cm.
-
Under the 'WheelFrame' component add a 'Wheelset' components, scale it to { 0.5, 1.0, 0.5 } and move it so that the two wheels
make the chair a wheelchair. Align them in height with the foot of the chair.
-
In the 'Details Panel' for the Wheelset component under the 'Collision' section selecet 'NoCollision' for 'Collision Preset'.
- For the chair actor switch Physics on from the 'Details Panel' -> Physics -> Simulate Physics checkbox.
- Move the chair anywhere near the track (< 2m).
- Hit Play.
The chair now gets railed and - driven by gravity - rolls down the track. Place other objects into the way of the wheelchair to
test that it interacts with the physical simulation. Note how the chair keeps rotating when it eventually leaves the track. It does this,
because this is its inertial movement when last being constrained by the track; see chapter7, contraint 5.
An example project, called railUnrealDevProject is provided. Unpack it
and install and activate the railUnreal plugin for it (see above). It provides several rigged sample rolling stocks and the results of the tutorials that you'll
find below.
Content
Curves are used to define a track's geometry (see Chapter 3). They are assets that can get created in the 'Content Browser'
from the railUnreal's 'Curve' section. The C++ classes derive from UrailCurve and thereby from UObject.
A curve can get assigned to one or more track components.
ULine: A straight line.
UArc: A plane arc.
UHelix: A three dimensional spiral.
UCubic: A cubic polynom curve.
UCubicHermiteSpline: A series of cubic polynom curves with various properties at the transitions.
UClothoid: A curve with linear increasing curvature. Also called 'Euler Spiral'.
URotatorCurve: A curve with evenly (with respect to arc length) rotating tangent vector.
URotatorWithOffset: A rotator curve with non zero starting angles.
URotatorChain: A series of Rotator curves that continue each other.
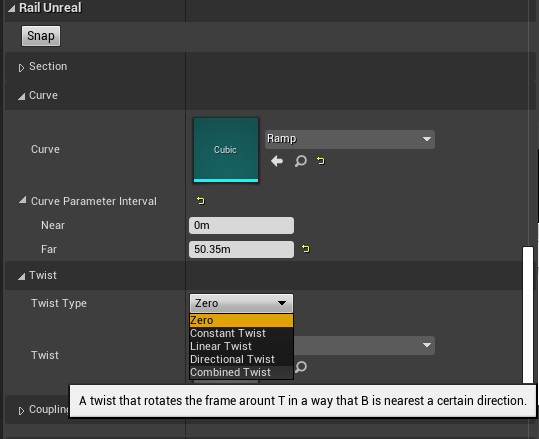
Twists rotate the frame of a track around its tangent, so that the up - direction of a track can be defined
(see Chapter 4). In general a curve's binormal vector will not be a satisfying up direction for a track. A twists
rotation can fix that. All twist C++ classes derive from UrailTwist and thereby from UObject. A track component
maintains its own twist, which can get selected from the track's 'Details Panel'.
UConstantTwist: A twist that stays constant over the whole track range.
ULinearTwist: A twist that varies linearly between two values from track front to track end.
UDirectionalTwist: A twist that rotates the frame arount T in a way that B is nearest a given direction.
UCombinedTwist: A twist that combines two other twists additively.
The track components of railUnreal provide the functionality of tracks and their geometry. They
can be added to an actor from the 'Details Panel' under 'Add Component' from the 'railUnreal' section.
UTrackComponent: Derives from UProceduralMeshComponent. Implements a static track by using a railCurve and a railTwist.
A WheelFrameComponent can ride on a Track.
UMovableTrackComponent: Derives from UTrackComponent. Implements a track that can move in a simulation and interacts
with the rolling stock that rides on it by solving the 'two bodies problem'.
The rail runner components of railUnreal provide the functionality of railed entities that stick to a track. They
can be added to an actor's UPrimitiveComponent-derived components from the 'Details Panel' under 'Add Component' from the 'railUnreal' section.
The parent UPrimitiveComponent then is railed, if it applies for physical simulation.
IRailRunnerInterface: Interface for trains and rolling stock that can be railed on a track and might provide
brakes and power engines.
UBogieComponent: Derives from USceneComponent; implements IRailRunnerInterface. A Component that deals with the couplings
of rolling stock and can carry child Bogies.
UWheelFrameComponent: Derives from UBogieComponent; implements IRailRunnerInterface. A wheelframe is a
bogie to which wheelsets can get attached and that can ride on a track.
UWheelsetComponent: Derives from UStaticMeshComponent. WheelsetComponents are needed by WheelFrames to
be able to roll on a track. They are also the origin of motor and braking forces.
Audio components are used to apply sound cues with the bogie's and wheelframe's events. One can select starting and stopping
events from them as well as select various parameters to be supplied for the sound cue. Append a sound component as a child of
the respective bogie or wheelframe component whiches events it should receive.
UAudioRailRunnerComponent: Derives from UAudioComponent. Provides the basic rail runner events for a sound cue.
UAudioBogieComponent: Derives from UAudioRailRunnerComponent. Adds the bogie specific events for a sound cue.
UAudioWheelFrameComponent: Derives from UAudioBogieComponent. Adds the wheelframe specific events for a sound cue.
Tutorials
Tutorial1: Building a track line, using the built-in track meshes.
- Create a new level.
- From the 'Place Actors' panel add an empty actor to the scene and name it 'Tracksystem'.
-
On the 'Details' panel hit the 'Add Component' button and from the appearing list's 'railUnreal' section add the 'Track' component.
Name it Track1. Keep the 'DefaultSceneRoot'.
-
From the 'Content Browser' in the 'Content/Curves' folder create a new Arc Curve by hitting 'Add New->railUnreal->Curve'.
Name it 'Arc50m'.
-
Double click on the newly created curve and add in the appearing dialog '50m' for 'Radius'. Keep the curve selected.
- In the 'Details Panel' for the 'Track1' under 'railUnreal/Curve' hit the little arrow to apply the selected curve to the track.
- In the 'Details Panel' for the 'Track1' under 'railUnreal/Curve/Curve Parameter Interval' enter '39.27m' for 'Far'.
- In the 'Details Panel' rightclick on 'Track1' and copy the track.
-
Rightclick on the 'TrackSystem' actor and paste the copied track. It gets named 'Track2' and inserted under the root
next to 'Track1'.
-
In the '3D Viewport' move the new track until its start position matches the end position of the old track quite closely.
On releasing the left mouse button, it snaps and alignes with the end.
- Repeat the last two steps four times until you yield six connected tracks in total.
- In the 'Content Browser' create a Line Curve. Create a seventh track under 'TrackSystem' and assign the Line to it.
- Change the curve interval's 'Far' parameter to '100m' and snap the track to the start of 'Track1'.
- Again, copy 'Track1' and append it to the end of the latest created track. Repeat this five times.
- Create a Cubic Curve, double click on it and change it's P2 to { 50m, 0m, 5m }.
- Change the tangents T1 and T2 of the Cubic both to { 75m, 0m, 0m }.
- Create a new Track under 'TrackSystem' and assign the Cubic to it.
-
In the 'Details Panel' for the new track under 'railUnreal/Twist/Twist type' select 'Directional Twist'.
- Snap the new track to the end of the last one.
- Copy and paste the cubic track and snap it to the open Arc.
The single tracks get coupled automatically on snapping them together or bringing them close together. Note how we
used a directional twist to bring the track with a cubic curve to up. In our case a 'Constant Twist' with -90deg
rotation would have been sufficient.
Tutorial2: Building a simple locomotive.
- Create a new level.
- From the 'Place Actors' panel add an empty actor to the scene and name it 'Steamlocomotive'.
-
On the 'Details' panel hit the 'Add Component' button and from the appearing list's 'Common' section
add a 'Cube' static mesh to the Actor. name it 'Base' and make it the root component.
- To make for the base of our locomotive, scale the cube by { 3, 10, 0.2 }.
- Add another cube component to 'Base', name it 'Boiler' and move/scale it to {0,-15,550} and {2/3,0.7,10} respectively.
- Add another cube component to 'Base', name it 'Cabin' and move/scale it to {0,35,800} and {0.833,0.3,15} respectively.
- Add another cube component to 'Base', name it 'Condenser', under 'Static Mesh' change it to 'Cone' and move/scale it to {0,-40,1300} and {2/3,0.2,10} respectively.
- Rotate the 'Condenser' by {180,0,0}.
- Add a 'WheelFrame' component from the 'railUnreal' section to 'Base'. Move it to {0,0,385}.
- Rotate the 'WheelFrame' component by {0,0,90}.
- Set for 'railUnreal->Bogie Height' 3m and for 'railUnreal->Bogie Length' 12m.
- Add a 'Wheelset' component from the 'railUnreal' section to 'WheelFrame', name it 'Wheelset1'. Move it to {-140,0,-1000}.
- For the static mesh of the 'Wheelset1' select the 'Engine/BasicShapes/Cylinder' model.
- Rotate and scale the 'Wheelset1' to {90,0,0} and {2,2,2} respectively.
- Copy 'Wheelset1' and paste it under the 'WheelFrame' component. Move it to {-60,0,-1000}
- Copy 'Wheelset1' and paste it under the 'WheelFrame' component. Move it to {20,0,-1000}
- Copy 'Wheelset1' and paste it under the 'WheelFrame' component. Move it to {100,0,-1000}
- For the 'Base' component switch on 'Physics->Simulate Physics'.
- From the 'Place Actors' panel add an empty actor to the scene and name it 'TestTrack'.
- On the 'Details' panel hit the 'Add Component' button and from the appearing list's 'railUnreal' section add a 'Track'. Rotate it by {0,-3,-90}.
- Move the 'Steamlocomotive' to come close to the track (COG <= 2m).
- Hit Play.
The 'Steamlocomotive' gets railed and - driven by gravity - rolls downhill, while being accelerated. If you set
'railGameModeBase' for 'World Settings->GameMode->Game Mode Override' you can shoot axles by hitting the 'space' key.
Also you can select the 'Base' component by clicking on it; hit the 'H' key to show some construction data.
The 'Height' property of the 'WheelFrame' component tells the loco at what height the center of geometry (COG) will
sit above the track on railing. The 'Length' property is merely for positioning the couplings (you might want to switch them
on and set them at a height about 2m). Note that the 'WheelFrame' component had to be rotated by {0,0,90} to align
the wheels with the locomotive. Also note that the 'Wheelsets' are rotated during simulation according to their
'Radius' property and that radius depends from the distance to the 'Anchor' which is set by the wheelframe's
'Height' property. Take a look at the schematics in Chapter8, there you'll have the
relationships between the different properties like 'COG', 'Anchor , 'Radius' or 'Heigth' etc. If the wheels would
overlap with the other parts of the loco, you will want to switch off collision for them.
We had to use some scaling and rotation to build this, what in general is not advisable. If you have the opportunity
of building your own models, just aling them along the X-axis and have the height in the Z - direction and avoid
any scaling to keep your life simple.
Tutorial3: Let's assume we want to build a modern locomotive like the TRAXX 147. What we need are separate
static mesh assets for the main body of the locomotive, the two bogies without wheelaxles and the axles including
the two wheels (all is contained in the sample project for the plugin). In general you want to define reasonable
collision shapes for the meshes in the Unreal Asset-Editor. The simple collision shapes are needed for dynamic objects.
Albeit only simple shapes can be defined, with several of them the basic shape of locomotive parts can be traced.
E.g. for the axles use a box and a capsule in combination. That done follow these steps:
-
Open the level 'TestLineOval' and save it as a new level. It contains a track course and activates the railGameModeBase.
-
From the 'Place Actors' panel add an empty actor to the scene and name it 'TRAXX_147'.
-
Add the body shape of the locomotive, by marking it in the 'Content-Browser' and selecting 'Static Mesh' from the 'Common' section
in the 'Add Component' list for the actor. Name the new component 'BodyBase' and make it the root component of the actor.
-
In the 'Physics' section of the 'Details-Panel' for the 'BodyBase' component select 'Simulate Physics' and specify 76000kg for mass.
-
From the 'Details-Panel' add the Bogie component from the 'railUnreal' section to it. Name it 'BogieBase'.
-
Position the Bogie component's Center of Geometry (COG) to the center of the locomotive at about 150cm height.
-
In the 'Details-Panel' under the 'railUnreal' section specify the 'Bogie Height' to be 150cm and the 'Bogie Length' to be 19.2m. Note that
we specify the 'Height' property as the height over the track, the locomotive would be railed at.
-
Under the 'BodyBase' component add the front wheel cart model by marking it in the 'Content-Browser' and selecting the 'Static-Mesh' component
from the 'Common' section. Name it 'BodyNorth'. Move it by { -530cm, 0cm, 130cm }.
-
In the 'Physics' section of the 'Details-Panel' for the 'BodyNorth' component select 'Simulate Physics' and specify 5000kg for mass.
-
Under the latter add a 'WheelFrame' component from the 'railUnreal' section and name it 'WheelFrameNorth'. Move its COG to { 0cm, 0cm, -65cm }.
Note that as for a bogie component the relative transformation of a wheelframe component denotes the COG. For a wheelframe this is best
placed at the axles level.
-
In the 'Details-Panel' under the 'railUnreal' section specify the 'Bogie Height' to be 65cm and the 'Bogie Length' to be 4.5m.
-
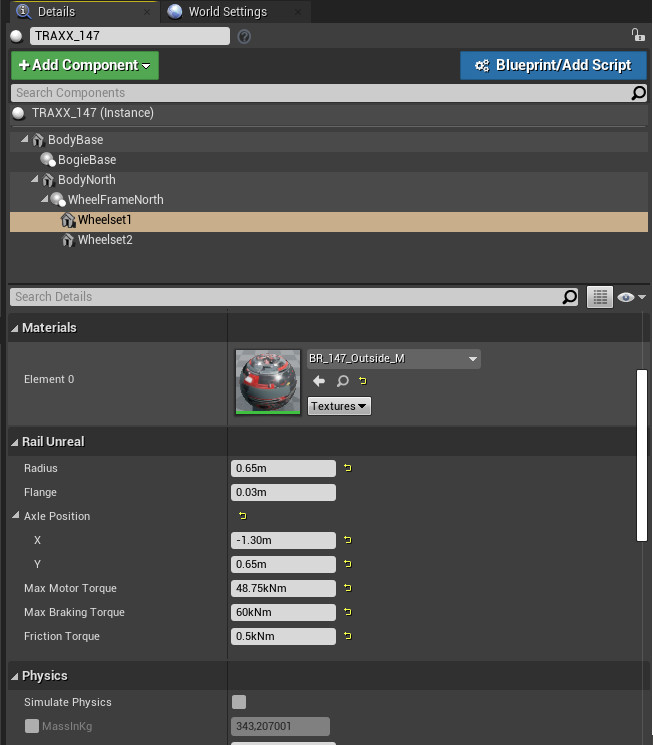
Under the latter add two 'Wheelset' components from the 'railUnreal' section and name them 'Wheelset1' and 'Wheelset2'. Assign the two axle models,
BR_TRAXX_147_Wheel1 to 'Wheelset1' and BR_TRAXX_147_Wheel2 to 'Wheelset2'.
-
Move 'Wheelset1' and 'Wheelset2' to { -130cm, 0cm, 0cm } and { 130cm, 0cm, 0cm } respectively.
-
For both wheelsets in the 'Details Panel' select for 'Collision Presets' in the 'Collision' section 'No Collision'.
-
In the 'railUnreal' section of the 'Details-Panel' for each wheelset component for 'Max Motor Torque' enter 48.75kNm, for 'Max Braking Torque' enter
60kNm and for 'Friction Torque' enter 0.5kNm.
-
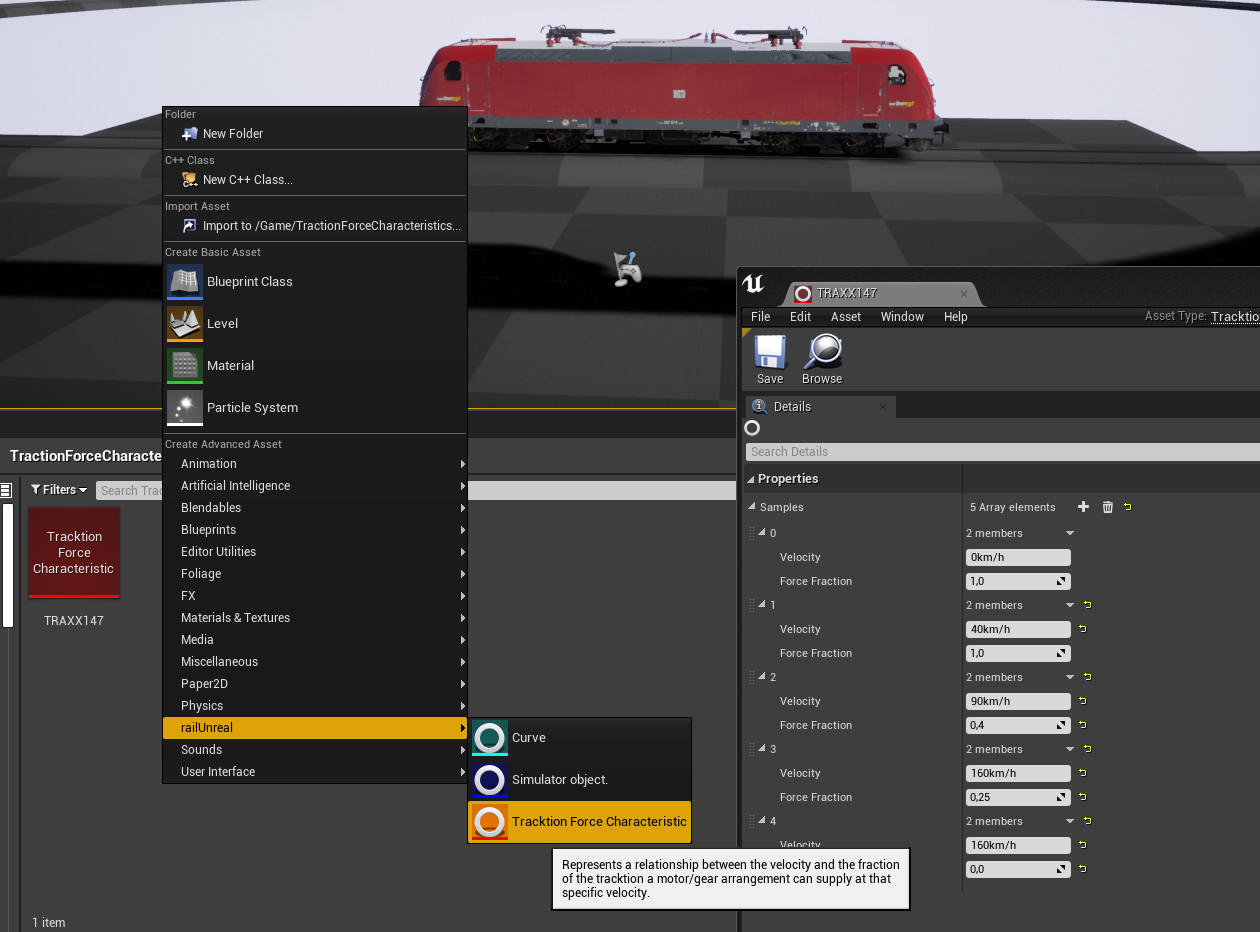
For the 'WheelFrameNorth' component in the 'railUnreal' section of the 'Details-Panel' select 'TRAXX147' for the 'Tracktion Force Characteristic'.
-
Under the 'WheelFrameNorth' component add a 'Constraint' component from the 'Physics' section and name it 'HingeNorth'.
-
In the 'Details-Panel' in the 'Contraints' section for the 'HingeNorth' specify 'TRAXX_147' for the constraint actor names and 'BodyBase'
for the constraint's first component and 'BodyNorth' for the constraint's second component.
-
In the 'Angular Limits' section set the 'Swing 1 Motion' to 'Free' and the 'Swing 2 Motion' to 'Limited' and 'Twist Motion' to 'Locked';
set the 'Swing 2 Limit' to 0 degree. This is done to give the wheelframe some stiff movement possibility when it comes to movements hillup
or -down.
-
Starting from step 8, repeat all the steps for the 'WheelFrameSouth', adjusting the positions and names accordingly.
- Place the 'TRAXX_147' actor somewhere near the track.
-
Now: hit play, and shoot axles at the model using the 'Space-Key'. Or click on the locomotive and add a target velocity by 'T-Key' or mouswheel,
a maximum thrust fraction by 'P-Key' and a maximum braking fraction by 'B-Key'.
Note how railUnreal works together seamlessly with other physics constraints that we used to attach the bogies. Also now we have two
anchors that attach the model to the track which get simulated separately; i.e. one might derail, while the other is still railed.
Note that for derailing you would have to make the force limits for the wheelframes finite. Also take a look at the 'TRAXX147Sound'
level to see how to apply the sound components.
Tutorial4: Building a track line, using third party track meshes[10]. The third party models are not
included with the 'railUnreal' project, but the basic principle is the same for all separate track models.
- Create a new Level.
- From the 'Place Actors' panel add an empty actor to the scene and name it 'TrackSystem'.
-
In the 'Content Browser' select the 'HG_Woody/Trains/Meshes/Tracks/SM_Track_Straight_4A' asset and from
the 'Details Panel' for 'TrackSystem' hit the 'Add Component' button and from the appearing list's 'Common'
section select 'Static Mesh'. Name it 'TrackModel1'.
- In the 'Details Panel' for the 'TrackModel1' component scale the model by { 10, 10, 10 }.
-
In the 'Details Panel' for the 'TrackModel1' component hit the 'Add Component' button and from the appearing list's 'railUnreal'
section select 'Track'. Name it 'Track1'.
- In the 'Content Browser' select the 'Content/Curves/Woody' Line Curve and attach it to the newly created track.
- Change the curve interval's 'Far' parameter to '10m'.
- Rotate the track component by { 0, 0, -90} and move it by {0, 0, 5 }.
- Switch off the 'Create Mesh On Game' flag under 'railUnreal->Section'.
- Mark the 'TrackModel1' and the 'Track1' component, copy them and paste them to 'TrackSystem'. A new track numbered '2' is created.
- Move the 'TrackModel2', so that its start is close to the end of 'TrackModel1'.
- Hit the 'Snap' button of the 'Track2' component.
- Repeat the last three steps to create a 'TrackModel3'.
-
In the 'Content Browser' select the 'HG_Woody/Trains/Meshes/Tracks/SM_Track_Curve_Left_90' asset and from
the 'Details Panel' for 'TrackSystem' hit the 'Add Component' button and from the appearing list's 'Common'
section select 'Static Mesh'. Name it 'TrackModel4'.
- In the 'Details Panel' for the 'TrackModel4' component scale the model by { 10, 10, 10 }.
-
In the 'Details Panel' for the 'TrackModel4' component hit the 'Add Component' button and from the appearing list's 'railUnreal'
section select 'Track'. Name it 'Track4'.
- In the 'Content Browser' select the 'Content/Curves/Woody90deg' Arc Curve and attach it to the newly created track.
- Change the curve interval's 'Far' parameter to '15.71m'.
- Move the track component by { -100, -100, 5 } (You might have to move the 'TrackModel4' away from any other track's end to avoid interferring with the snap automatism).
- Switch off the 'Create Mesh On Game' flag under 'railUnreal->Section'.
- Move the 'TrackModel4', so that its start is close to the end of 'TrackModel3'.
- Hit the 'Snap' button of the 'Track4' component.
- Copy 'TrackModel4' and 'Track4' and snap the copy to its end.
- Copy 'TrackModel1' and 'Track1' three times and snap it in a row.
- Copy 'TrackModel4' and 'Track4' two times and close the gap.
- Hit Play.
For many kinds of track models there are curves to match. Alternatively there is a collection of sections to auto generate
track shapes that can be augmented by materials. Note how the editor meshes in the tutorial are not created in the game.
But nevertheless the tracks are present and constrain a railed wheelframe as you might see from the next tutorial.
Tutorial5: Building a wooden locomotive with 'Woody Trains'[10]: The third party
models are not included with the 'railUnreal' project, but at the Unreal Marketplace you can find that collection
of simple wood models to build trains from. We use these since it provides the rolling stock as single parts
and it is some challenge for the railUnreal pluging, due to the need of scaling and rotation to move the parts
in place.
-
Open the level 'HG_Woody/WoodenOval' and save it as a new level. It contains the wooden track course from tutorial 4.
-
From the 'Place Actors' add an empty actor to the scene and name it 'WoodenLocomotive'.
-
In the 'Content-Browser' navigate to the HG_Woody/Trains/Meshes/Trains folder and mark the 'Engine_Base_001' model. From the
'Details-Panel' for the actor add the 'Static Mesh' component from the 'Common' section and make it the root component of
'WoodenLocomotive'. Name it 'Engine_Base_001'.
-
Since this is a toy railroad, scale the mesh by a factor 10 in all dimensions.
-
Add a WheelFrame component from the 'railUnreal' section under the static mesh component, rotate it by 90 degree around Z
and move it by { 0, -23, 10 } to the center of the locomotive. Name it 'WheelFrame'.
-
In the 'railUnreal' section specify 'Bogie Length' to be 5.5m and 'Bogie Height' to be 1m.
-
Under the 'WheelFrame' component from the Rail section add a 'Wheelset' component and name it 'Wheelset1'.
-
Attach the model Wheel_001 to the 'Wheelset1' component, scale the 'Wheelset1' component by a factor 10 in all dimensions,
rotate it by 90 degree around Z and move it by { 15, 7, -6 }.
-
Under the 'Wheelset1' component add a 'Static Mesh' component with the Wheel_001 model from the HG_Woody/Trains/Meshes/Trains folder
and name it 'Wheel1'.
-
Rotate 'Wheel1' by 180 degree around the Z direction and move it to { -14, 0, 0 }.
-
Set the 'Collision Preset' for 'Wheelset1' and 'Wheel1' to 'NoCollision'.
-
Mark the 'Wheelset1' component and the 'Wheel1' component, copy them both and paste them parallel to 'Wheelset1' (mark 'Wheelset1' for that).
The numbers are counted up automatically. Do this three times. Move each copy by { -10, 0, 0 } compared to the previous axle.
-
Under the 'Engine_Base_001' component from the 'Common' section add the Engine_005 model and name it 'Engine_005'.
-
Under the 'Engine_Base_001' component from the 'Common' section add the Engine_Cabin_004 model and name it 'Engine_Cabin_004'.
-
Under the 'Engine_Base_001' component from the 'Common' section add the Engine_Element_003 and name it 'Engine_Element_003'. Move
the element by { 0, -20, 20 }.
-
In the 'Physics' section of the 'Engine_Base_001' component activate 'Simulate Physics'.
-
Move the 'WoodenLocomotive' near the track and run the simulation.
With the 'railGameModeBase' for the 'World Settings' 'GameMode Override' you can shoot axles to drive the locomotive (hit 'space' key).
Or tilt the 'Tracksystem' by some degrees to let gravity drive the loco.
Frequently Asked Questions
-
Why is my locomotive/waggon moving erratical? This is typically happening if parts of your models are self - colliding.
Or collisions might happen with other models or tracks. Make sure to have followed the above prerequisite setup and specify
the collision presets (railCoupling) correctly and take a look at the simple collision shapes that come with your models: they might be
not appropriate.
-
My model is not moving at all if I hit play. The primitive component to be railed has to have 'Simulate Physics' activated to it. Then
remember that some force is needed to make a rail object move. Give it a motor or have gravity working on your model or just select 'railGameModeBase'
for the 'Game Mode -> Game Mode Override' in the 'World Settings Panel' for your level and shoot some axle at it by hitting the 'Space' key.
-
My locomotive/waggon does not rail but rather falls down. Make sure your actor has a WheelFrame component with at least one Wheelset
attached to it. There is a 2m search limit for the COG to find a track inside. So try to put the COG closer to the center of a track at
height level of the rows. Sometimes a location on a track with a complicated curve can not be found. Try another location in that case.
-
Why on movable tracks my locomotive sinks into the track and/or the simulation becomes instable? The simulation in general can
become instable, if the masses of jointed objects differ too much. Try to make the physical object that carries the movable track heavy in the
order of 1/10th to 10 times the mass of the rolling stock it is supposed to support.
-
What are the accuracy limits of the plugin? Albeit we tend to call this a physical simulation in the sense that it follows
Newton's laws of motion, it has to be said that this is not a very 'precise' simulation in terms of calculation accuracy. It is based
on NVidia PhysX engine, made to be used in games and animations with performance in mind, but has to be taken with caution in technical
engineering. The engine's limits are of cause also the 'rail' plugin's limits. See also 'Physics vs. PhysX' [11]
at the NVidia PhysX SDK 3.4.0 Documentation.
-
How many tracks and rolling stock can be simulated? Are there any limits? There are always limits on a given system, but they are not
known to us. With EEPTSM we built quite big railroad systems (using the trax-library) with many, many trains, and never encountered a
performance problem due to the physical simulation. Trains of aprox ~100 wheelframes, hauled by several locomotives uphill where still working.
Problems with rendering all that stuff at once occured far earlier than any simulation limits. Regarding the tracks, there is no performance limit either,
since as long as they ain't moving tracks, they do not need any calculations. However, there is a limit with the total extent of a track system,
which shall not exceed a diameter of 20km. This is due to floating point accuracy far away from the origin. Layouts bigger than that e.g. could be
divided into modules, each centered around the origin; or they might use some 'regauging' mechanism.
-
Does the plugin work in UE5? We plan to provide compatible versions for UE5 as long as this is feasible. But keep
in mind that the plugin targets 'NVidia PhysX', which Epic aims to replace by 'Chaos'. We're quite optimistic that PhysX will
be available within Unreal for years to come though, albeit you might have to compile the engine yourself. 'PhysX' is a velocity based
(a.k.a. momentum based) physics engine, while 'Chaos' works position based (XPBD). The whole idea behind the rail plugin is to make
use of the fact that curve theory easily translates to velocities and therefor can be directly integrated into the 'PhysX' engine;
at this point we don't see a similar elegant way to do this with 'Chaos'.
- ...
Known Issues
Support
On problems contact us at: horstmann.marc@trendverlag.de
References
[1] EEP Eisenbahn.exe Professional, Trend Verlag.
[2] Microsoft Train Simulator, Microsoft Corporation 2001.
[3] Train Template, ZerstorenGames. Unreal Marketplace, 11-19-2019
[4] Transport Fever.
[5] Train, Rail & Roller Coaster System, Polygon Jelly. Unreal Marketplace 04-05-2017.
[6] EEP Train Simulator Mission, Trend Verlag, 2017.
[7] Zug-Unfall-Simulation (Kollisions-Feature) in EEP Train Simulator mission, Youtube, 2016.
[8] trax - The Track Library.
[9] Trend Redaktions- und Verlangsanstalt mbH.
[10] "Woody Trains", Hotgates - Apr 13,2019.
[11] NVidia PhysX SDK 3.4.0 Documentation.
<<< previous | contents | next >>>